A compass is a device designed to determine the cardinal directions and navigate the terrain. All magnetic compasses have a needle, and most models have a disk with a scale, numbers and letters printed on it. We will talk further about what they mean, how to use them and how to use a compass to find out the location of the cardinal directions - north, south, east and west.
The direction of south or north on the compass is indicated by an arrow, and the scale is then “adjusted” to it.
A little about the compass design
The location of the cardinal directions is sprayed along the device's dial , which helps to correctly navigate the area if there is no magnetic or electromagnetic interference. The instrument's needle invariably shows the north magnetic radian, marked with the first tip, while the second will indicate the south. You just need to figure out what indication the symbols on the compass have.
When orienting, it is necessary to take into account that the compass data does not coincide one hundred percent with the geographical ones, since the needle tries to be placed along the magnetic meridian, showing the geomagnetic poles of the earth, which are not identical to the geographical ones. This error in the light directions of the planet on the compass is called “magnetic declination”, and it does not have a stable value.
Setting up section symbols
Connecting a dimmer (light brightness control)
Creation of cross-section symbols is carried out through the menu Tools → Symbols → Cut line or using the Cut line command on the Symbols toolbar. At the beginning of the command, you must select the point to place the first symbol of the cut arrow. Then you need to determine what type of cut will be shown - simple or complex (with a broken cut line). If you intend to show a simple cut, then you must then indicate the point of placement of the second cut arrow symbol. If you intend to show a complex section, then you must first click the Complex section button and sequentially indicate the placement points of the bends of the complex section. The second cut arrow symbol will always be placed at the last point. To complete entering a complex section, press the Complex section button.
Next, you should enter the letter designation of the section, if it is not set automatically. When you click the Text field, the Enter Text dialog box appears. In which you can manually fill in text fields. The first field is the letter designation of the section. The second field is additional information (for example, the number of the sheet on which the cut is located).
If you check the Auto sort option, the program will automatically assign a symbol to indicate the section. This option may not be available if in the Tools → Options menu on the Current Document tab, in the Auto Sort section, the Auto Sort option is unchecked. Enabling the Sheet and Zone options automatically places the sheet number. Where the incision is placed. Or zone designation in the additional field of the section symbol. Using the Placement group of buttons, you can set the placement of additional information at the first or second arrow of the section.
After these operations, it is necessary to choose the direction of view of the incision. To do this, move the mouse across the cut line in one direction or another. you need to achieve the desired location of the gaze arrows and press the left mouse button or the Enter key.
Then the program offers to place a letter designating the view with a section. In this case, it is proposed to configure 2 tabs: on the Parameters tab, settings are made for the parameters of the new sectional view, and on the View Designation tab, settings for the text commentary for the sectional view are made.
- — Cut line command
- — Button Complex cut
- — Buttons Placement
How to determine cardinal directions
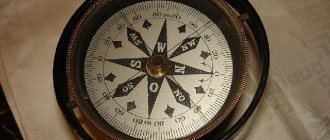
The compass mechanism is simple and ingenious - a magnetized needle, placed in a case under transparent glass in the center of the dial (dial), when released from the stopper, will show the north pole with its north tail, and the south pole, respectively, with its south tail. The limb is marked with the cardinal directions using letters. If the device is domestic, then the letters will be taken from the Russian alphabet, but if the device was not made in our country, then in accordance with international designations, Latin.
The dial has a circular scale of 360 degrees, which is divided into 4 identical sectors, increasing clockwise. The size of the scale step for an individual device may be different, however, in any case, any of the directions of light is delineated by certain degrees:
- north is marked 0 degrees,
- south - 180 degrees,
- east - 90 degrees,
- west - 270 degrees.
Determining the cardinal directions using the device is quite simple , but in order for the mechanism to indicate the correct direction, a number of simple rules must be followed.
The device must be given an exact horizontal position - for this it is either placed on a flat surface or held with an open palm slightly below chest level.
There should be no magnetic interference nearby, such as:
- accumulations of metal,
- railway track,
- power lines,
- as well as other similar interference.
If these requirements are not met, the arrow will show the wrong direction.
As soon as the compass is in the correct position, you will need to release the lock , which plays the role of a brake or stopper.
The released arrow, having wavered, will take a firm position when the specially marked northern tip indicates north, and the opposite one indicates south.
After this, you need to align the tips of the arrow with the cardinal directions marked on the dial.
In order to determine a route on the ground, it is necessary to correctly select the desired direction of the path, corresponding to the desired part of the map or outline.
Section (section), arrow view and detail
To create a section (section), you need to indicate in the drawing the designation of the cutting plane, to create an arrow view - the image of the arrow of the viewing direction, and to create a detail element - its designation. After this, the system will automatically generate a section/section, arrow view or detail element. If necessary, you can change its scale. A standard type designation (for example, “B-B” or “A (2:1)”) will also be created automatically.
When creating a cut or section, you can additionally customize the hatching parameters - select its style, set the desired step and angle of inclination.
Rate this article:
Directional designations
by letters on the compass accepted throughout the world , which are understandable to any inhabitant of the globe, but Russian-language letters are also possible.
- The northern direction is denoted by the Latin letter N (in Latin - north) or the Russian letter - C (that is, “north”).
- The southern direction is shown by the Latin S (in this ancient language - south) or our Yu (that is, “south”).
- The eastern direction is marked with the Latin E (in Latin - east) or the letter B of the Russian alphabet (that is, “east”).
- The Western direction corresponds to the Latin W (west in Latin) or the Russian Z (that is, “west”).
Salting (that is, clockwise) it looks like this: at the top - N (or our C - “es”), further on the right side of the limb is located - E (or our “in” Below - S or our Yu, on the left - W or our Z.
Landmarks for the directions of light, both for maps and globes, and for compasses and terrain, will be placed identically:
- if you position yourself facing north, the north pole will be in front;
- the south pole will be behind;
- the eastern direction will be located on the right hand;
- western - on the left hand.
It is important to understand that the compass, due to the presence of magnetic declination, does not indicate directions one hundred percent correctly! The compass error determines the magnetic declination.
Whereas the instrument indicates geographic light directions, they will actually be offset to some small extent by some amount in degrees . Since the geographic and power poles of the earth do not coincide, it is necessary to make corrections when accurately calculating the azimuth before the upcoming long route. If the expected path is not very long, and the magnetic declination does not exceed 10 degrees, then it makes sense to do without corrections.
Declination is mainly indicated outside the map fields for a specific area. If this is not indicated, it can be found in the reference book - magnetic observatories regularly update the magnetic declination values in degrees that are typical for a particular area.
The eastern declination is distinguished. It happens when the needle of the device deviates from the north geographic pole to the east, and the westerly direction when the needle deviates to the west.
Please note the following:
- Western declination is indicated by a minus (-);
- eastern - plus (+).
Correction for the declination value, which is calculated from the device (or, in extreme cases, from the reference book), will allow you to establish the true settings of the light directions.
The path is first measured by azimuth, and according to it they move across the terrain. The calculated azimuth angle is the value in degrees obtained between the direction of the path to the desired object and the meridian. Then the azimuth that was found on the map will be true, and the one obtained using a compass will be magnetic.
Advantages and disadvantages of GPS
In the digital age, more and more travelers are abandoning paper maps in favor of electronics. We will compare what is better and more convenient, and what to give preference to.
The advantages of GPS include:
- Excellent orientation in conditions of poor visibility, fog, snow, accurately determine the path;
- Support for local regional maps;
- Loading already laid routes with all the necessary marks;
- Visualization of completed tracks, uploading them to the Internet.
Of the minuses, we note the following:
- Skills and ability to work with a map become dull;
- Dependency on power supply;
- Possibility of signal loss.
Technology is constantly evolving, and something new and better appears every day. The same applies to orientation and navigation devices. And whatever they are, the basic basis is the principle of how and due to what the compass works.
Calculating azimuth
The map shows the true meridians meeting at the point of the true geographic pole. In this regard, the angle between the meridian that goes north and the course of the path obtained from the map will differ from the angle found using the instrument , since the compass needle is located along the magnetic meridian, and not at all geographical.
If there is an eastern magnetic declination in this area, then its value must be subtracted from the azimuth, which was obtained using a compass on the spot, so that its value converges with the true azimuth, which is found on the map. That's why it is indicated by the sign “—” (minus).
If a western deviation is observed in this area, then its length must be added to the magnetic azimuth in order to obtain the true value. That's why it's marked with a + (plus) sign.
You can be calm about the calculations , because corrections for magnetic declination provide a guarantee that the trip will take place within the planned boundaries and will coincide with the true geographical indicators, and the route will not deviate from the map.
Even though progress spoils human society with digital navigation techniques, the classic compass with a magnetized needle is as popular and reliable as ever. Its operation does not require power, the presence of a satellite or a cellular tower, which means that this device will never fail: it will not break, will not run out of power, etc. And even a child can determine the cardinal directions on the compass.
Destruction of associative connections
The presence of connections between the model and its image allows you to constantly monitor their correspondence to each other, but at the same time makes it impossible to manually edit geometric objects in associative views.
Whenever you open drawings that contain associative views, the system checks for a match between the image and the model. If discrepancies are detected, a request is issued to rebuild the geometric objects of the drawing. If the product is complex, then both checking and rebuilding can take considerable time. Therefore, at the stage of drawing up drawings or after finishing work on them, when the connection with the model is no longer necessary, a technique such as breaking the associative connections between views and models can be used.
After destruction, the associative view turns into a set of primitives (segments, arcs, etc.) and becomes a regular user view of the KOMPAS-GRAPHIC drawing.
Useful tips
In specialized stores that sell accessories for fishermen, hunters, tourists or athletes, you can find various modifications of magnetic compasses. In order to find your way in an unfamiliar place, the simplest, cheapest device is enough. It’s hardly worth spending money on a more “sophisticated” device, given that all its capabilities (functionality) will not be implemented in practice anyway. Probably, in this regard, the only useful recommendation is to pay attention to “liquid” compass models. A special mixture is pumped inside their flask, which “quenches” the vibrations of the needle. Such modifications of the device are more convenient in that they allow you to navigate without stopping directly while moving. For a tourist traveling on foot, such a compass is preferable. There are several ways to check the functionality of the device. The simplest of them is to bring the compass closer to any metal product (stained glass frame, door handle, etc.) right in the store. The arrow should not just deviate, but orient itself smoothly, without jerking. This sometimes happens with cheap models due to improper mounting on the axle. Those who use a compass to “reference” a map to the terrain should remember such a calculation parameter as magnetic declination. The device shows the magnetic pole, but for all maps the geographic pole matters. In most cases, this error in orientation is not taken into account, but if maximum accuracy in determining coordinates is required, it will have to be taken into account. Relevant reference data is indicated on each sheet of the map.